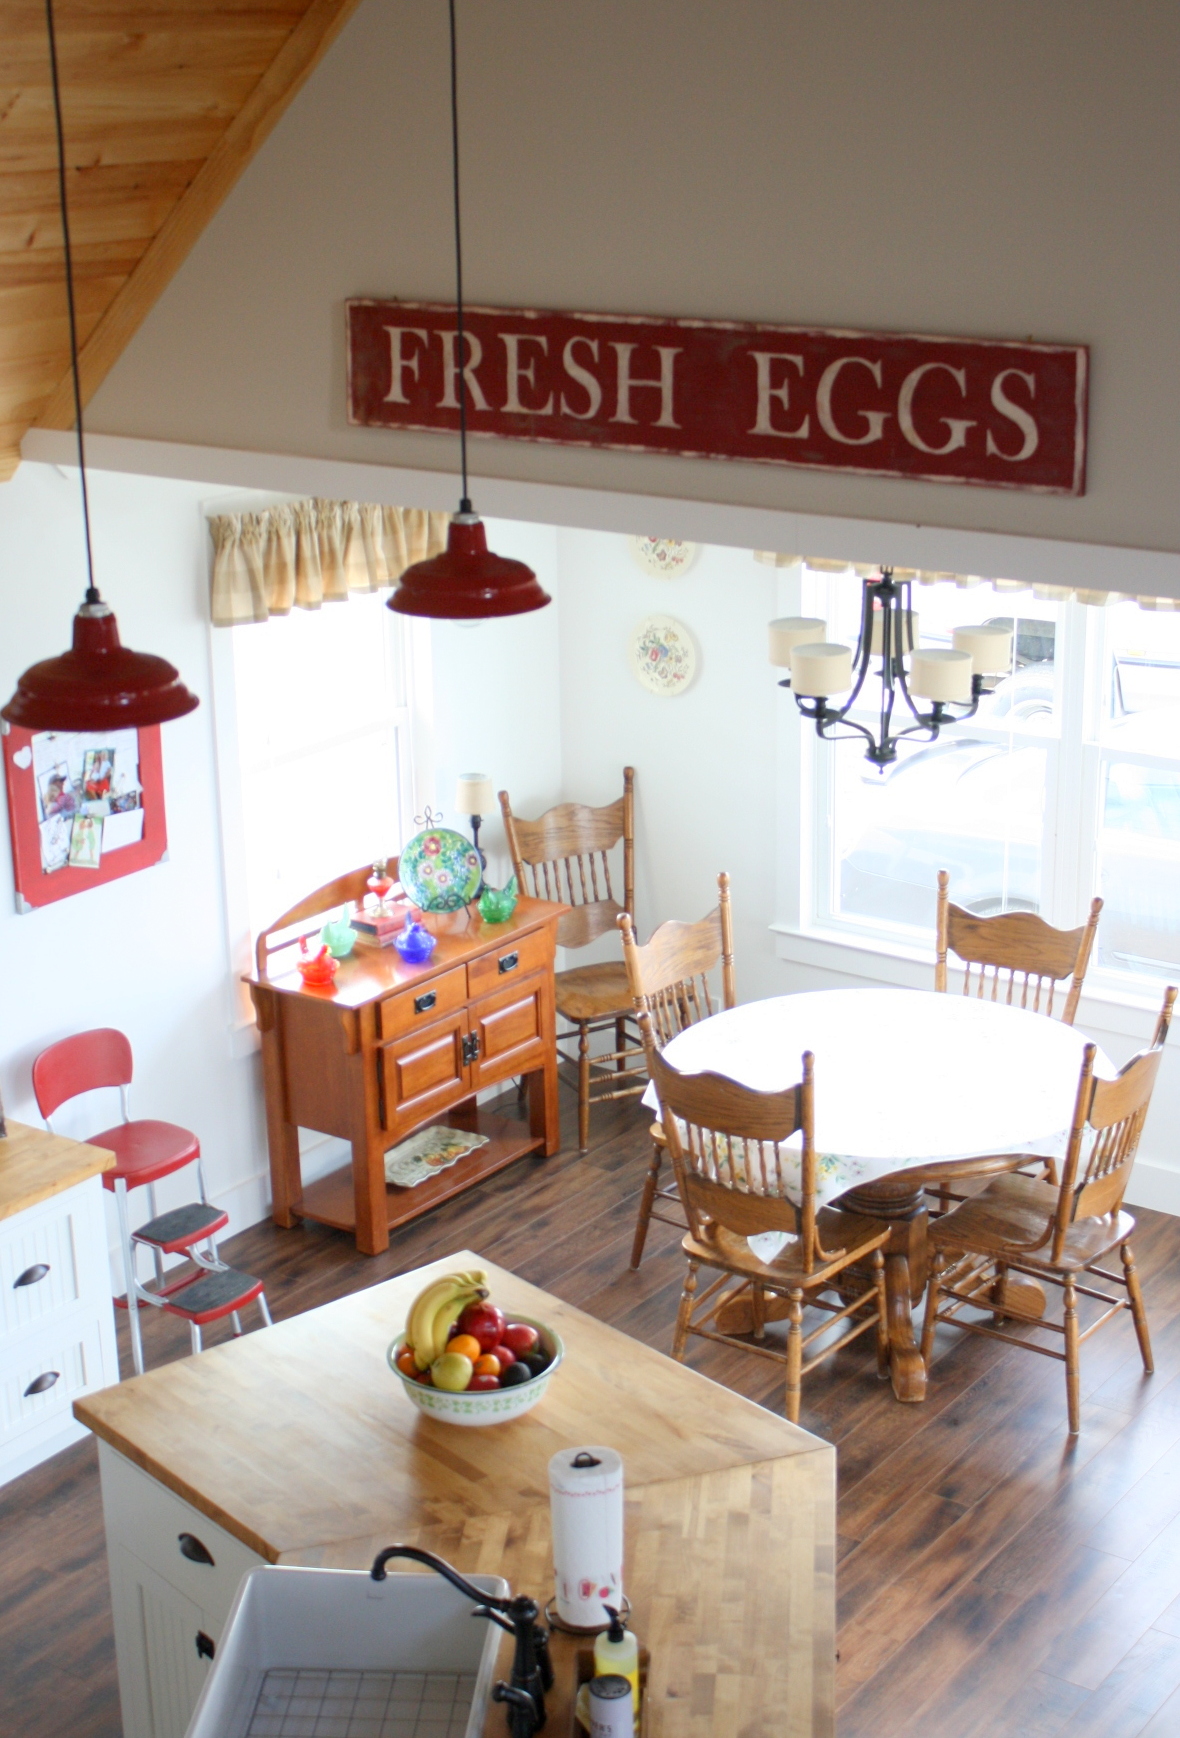
My Fresh Eggs sign hanging in my kitchen is still my very favorite.
.
I’m in love with vintage wooden signs. The problem is that the ones I’ve seen that I really, really want I can’t afford. There is a very large wooden sign that hangs in a cafe on the square of our little local town and I’ve eyed it for years. One day I thought, “Why can’t I just make one”? So I did. Since then, I’ve made numerous signs, a few for myself and a few for gifts.
.
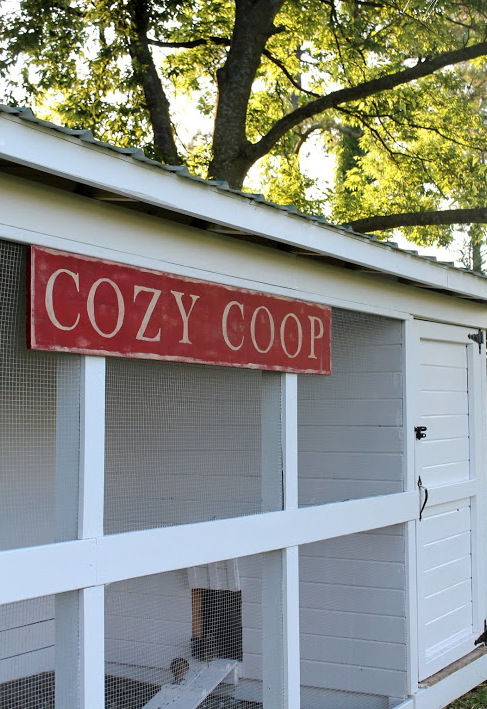
I made the Cozy Coop sign for my daughter’s chicken house!
.
 .
.
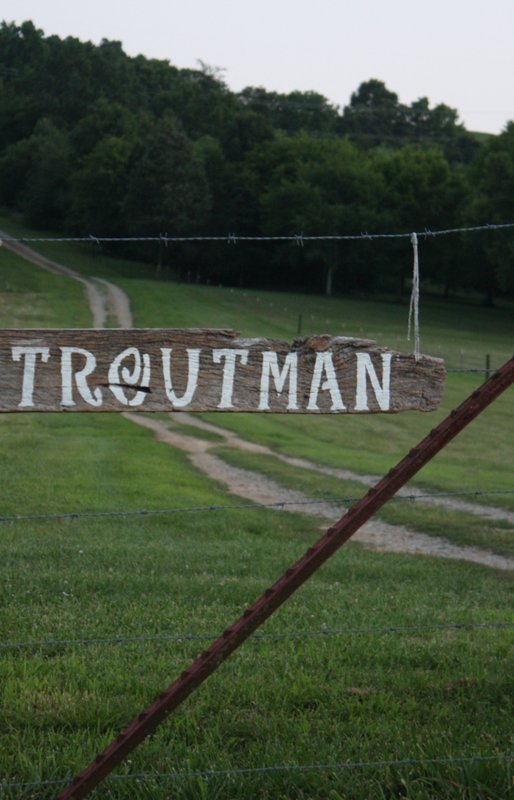
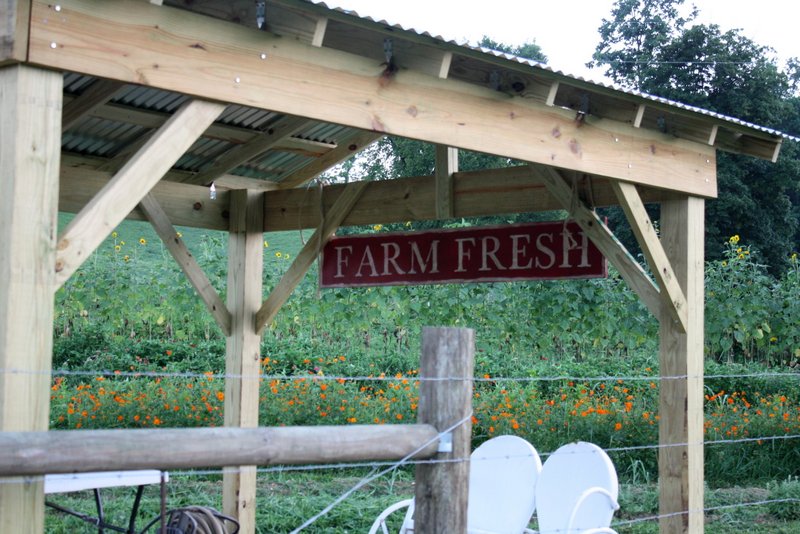
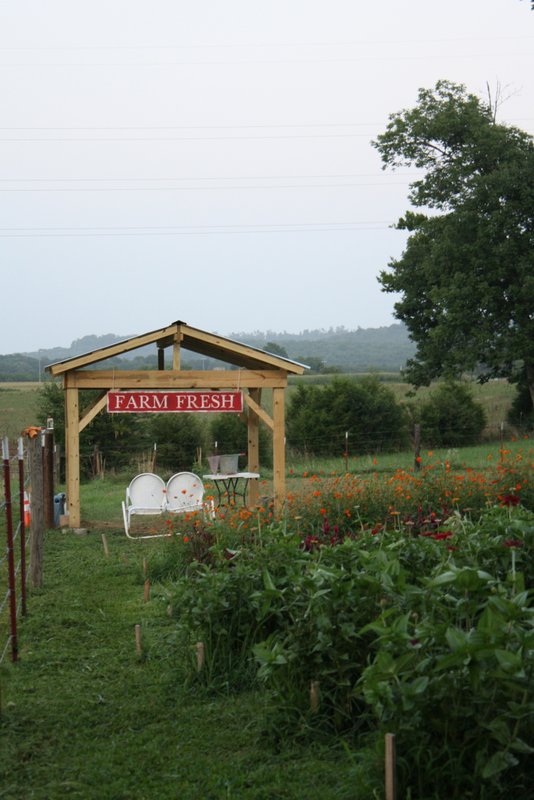
The sign at our farm entrance.
.
I’ve painted directly to old barn wood and that is a super fast and easy project.
.
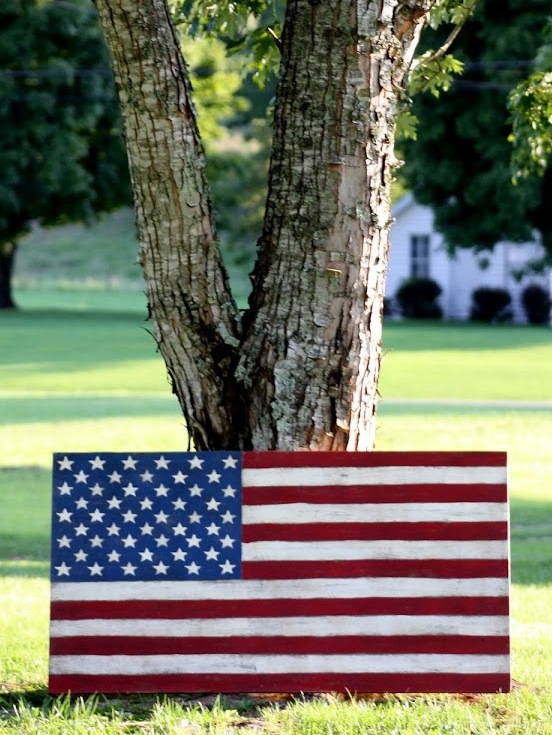
This flag was one of the most enjoyable projects I’ve ever painted on wood.
.
They don’t have to be signs with words. I’m not very artistic but I can do most anything if it is straight lines or a stencil! I used my Cricut cutter to make star stencils for the above flag.
.
.
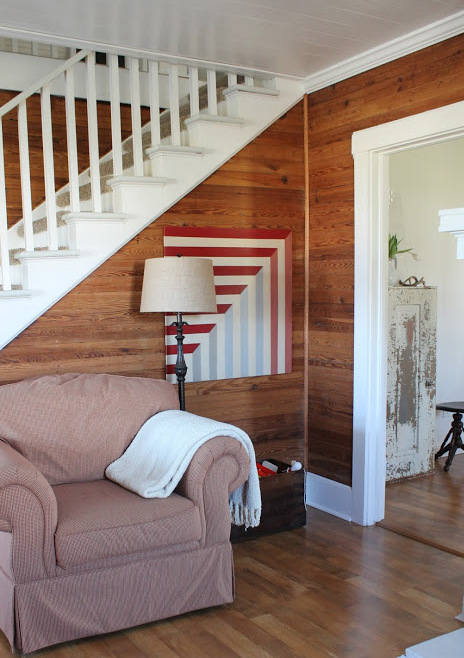
I dabbled around a bit with painting a wooden quilt and made the above sign from a drawing that my daughter found in a magazine. She loves it in her country home.
.
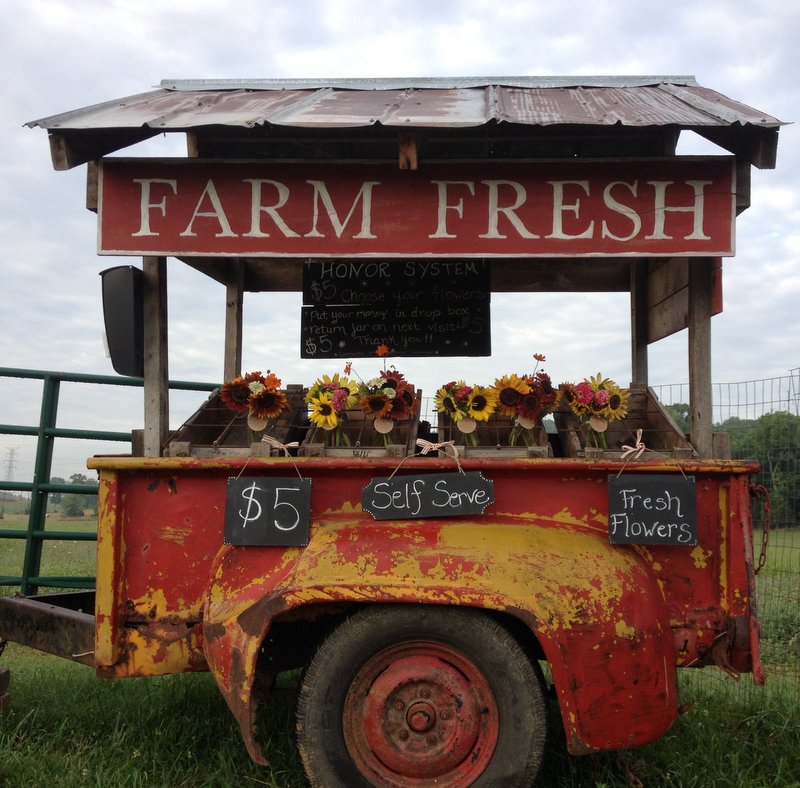
Our little roadside flower stand. We kind of love it!
.
I think most of my readers here know that my daughter and I are flower farmers on a very small scale. Well, our husbands took pity on us working in the hot sun of our garden as we arrange our bouquets for our roadside stand each morning, and they built us a great little open air work shed. We’ve been talking about prettying it up a bit and I decided to start with a sign. The sign duplicates the one I made to hang on our farm stand, pictured above.
.
I took pictures of the process so that I could teach you how to make a very fun vintage look wooden sign. So here we go.
.
Step One: Buy your board. I like long word signs, especially if you are going to be painting more than one word. The board I purchased for this sign is six feet long by 1 inch thick. Some lumber yards have boards that are split or damaged that they will sell you very cheap, or even just give to you. The more splits and dings, the more authentic it will look.
.
.
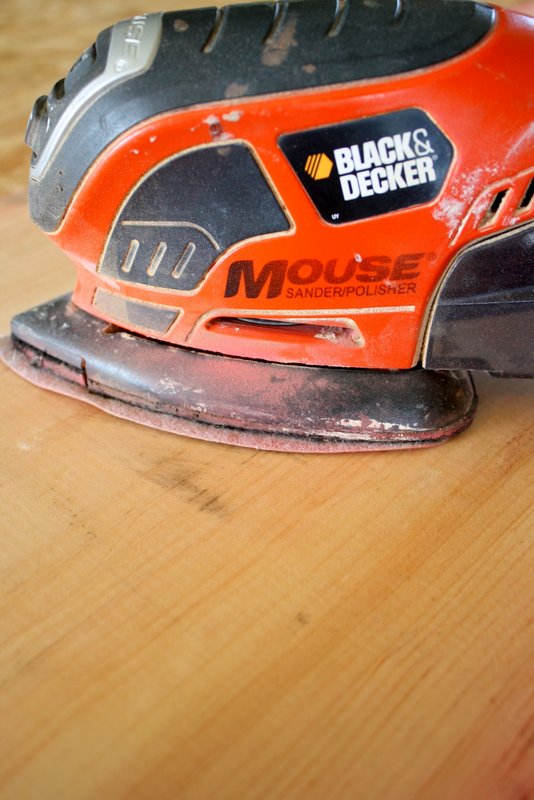
Step Two: Sand your board. If you have a little mouse sander give the board a light sand to remove any splintery wood. (If you don’t have a mouse sander, buy one! They are inexpensive and helpful in so many projects.)
.
,
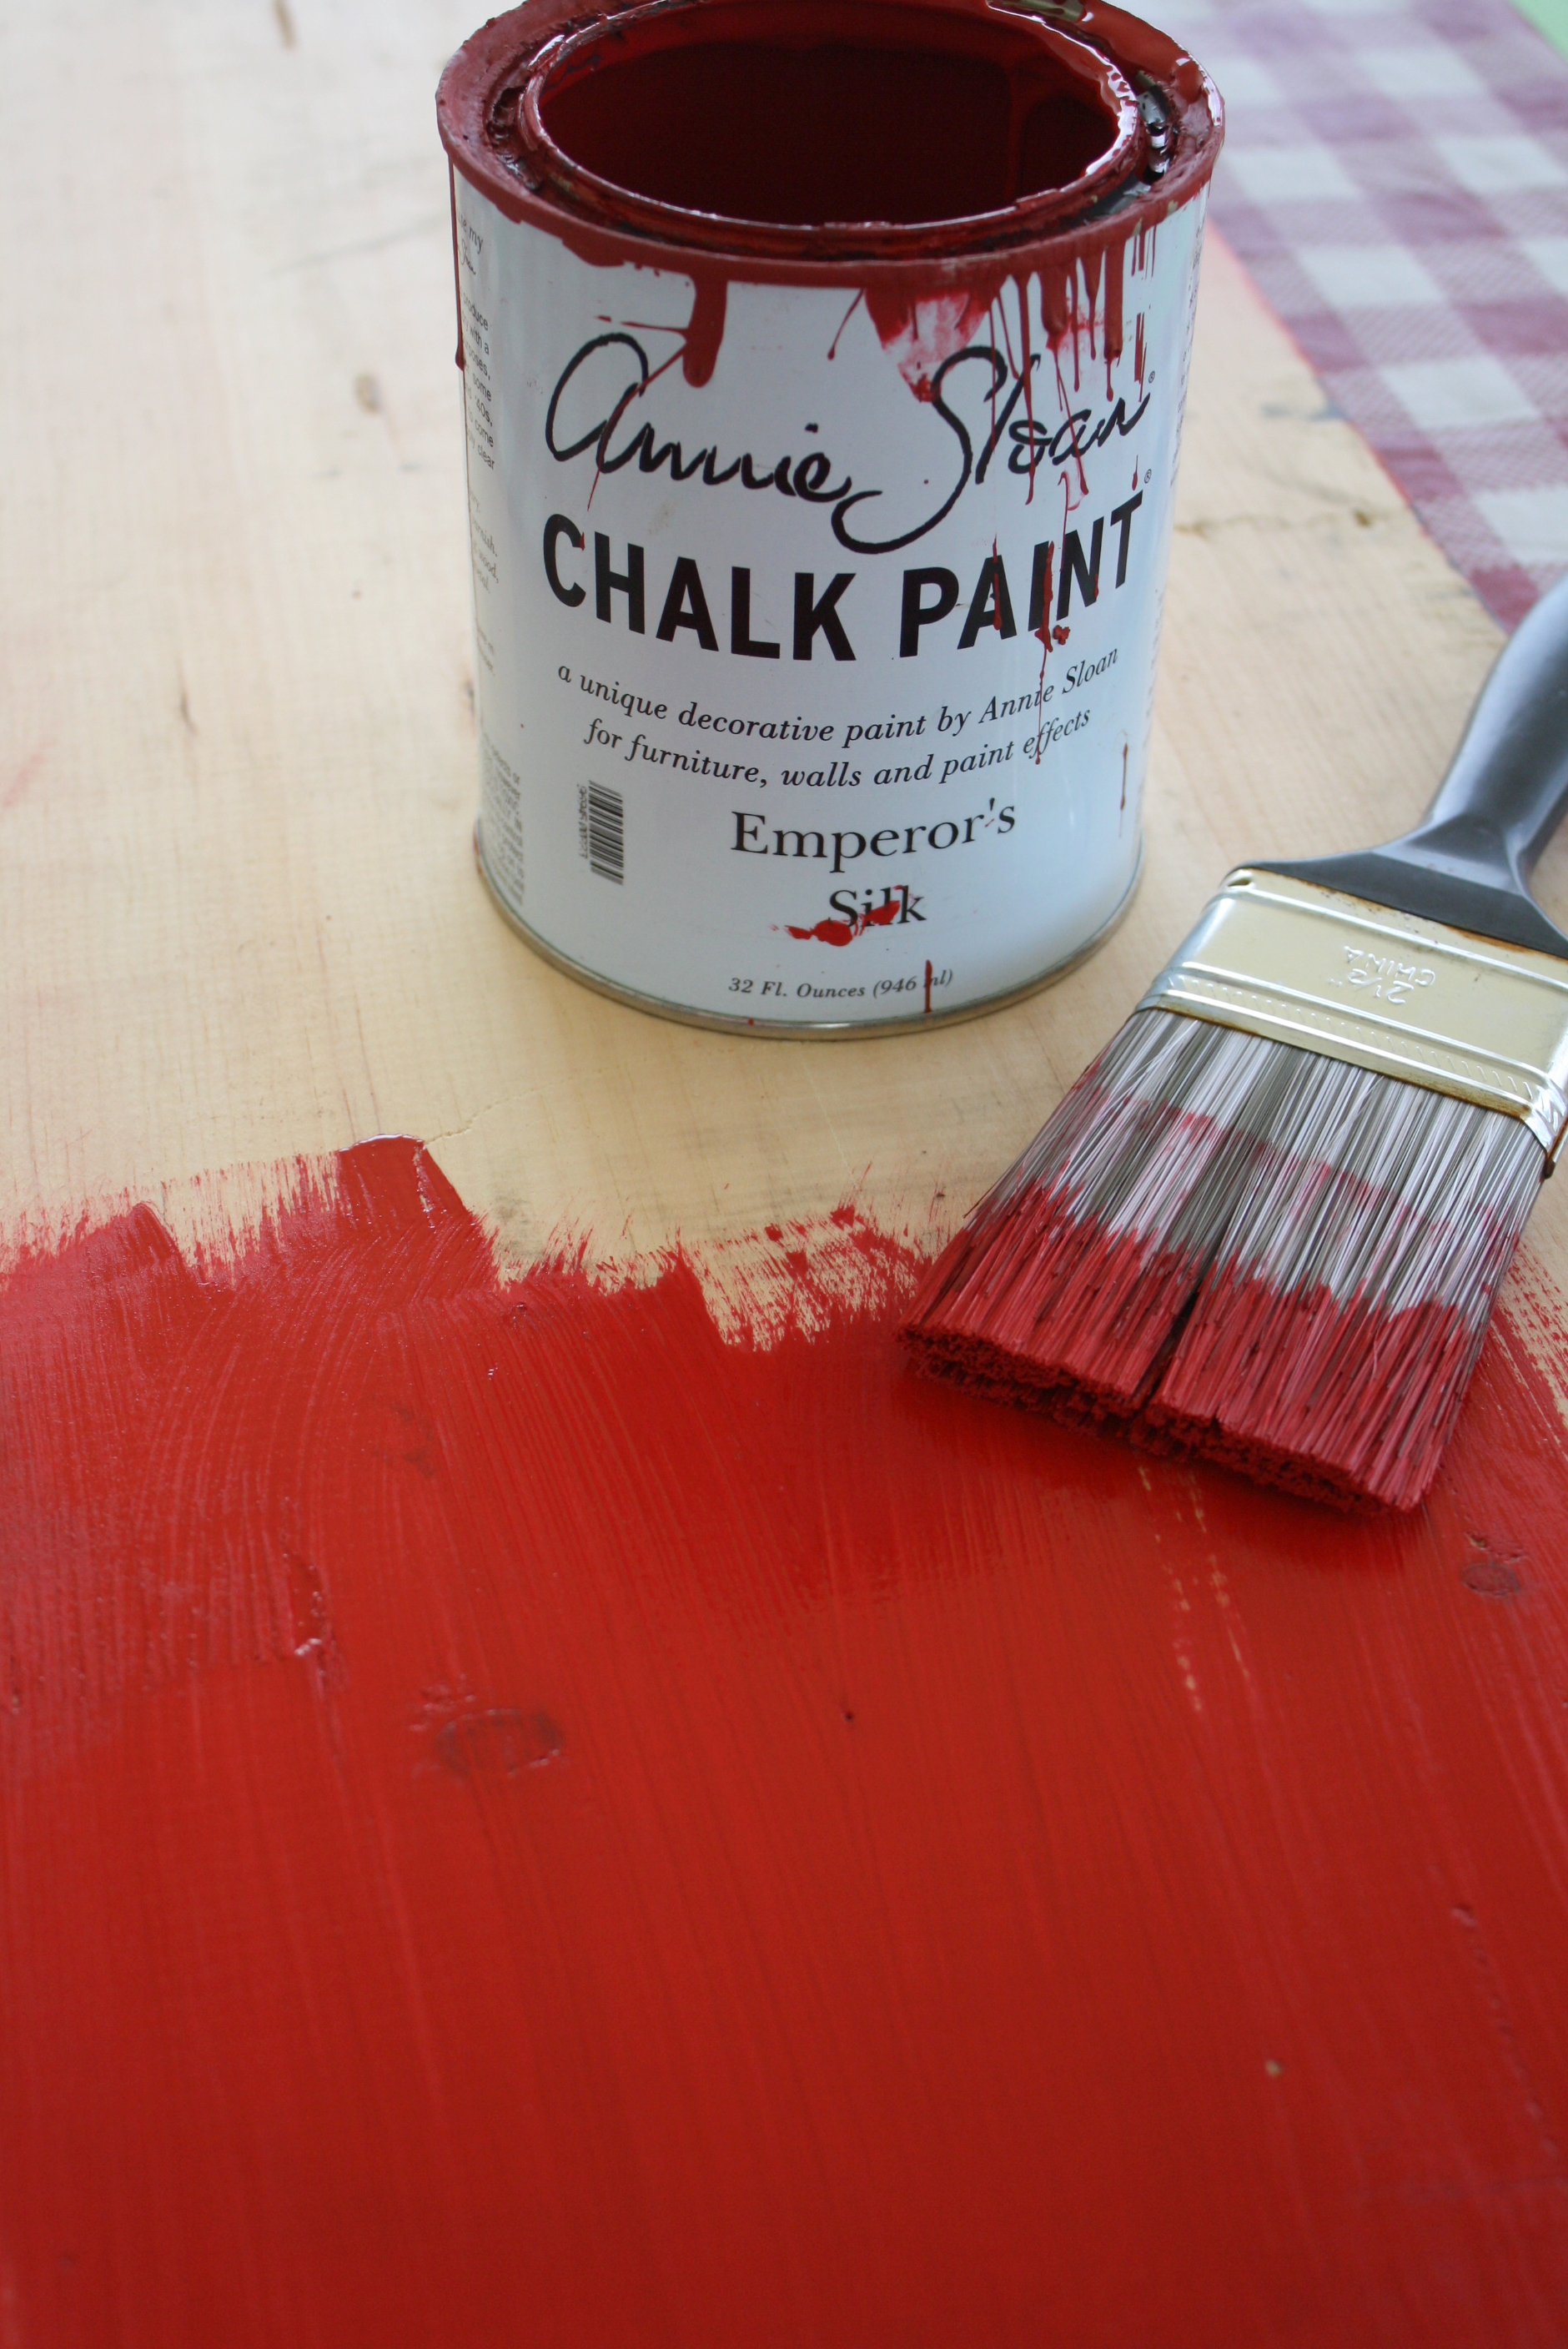
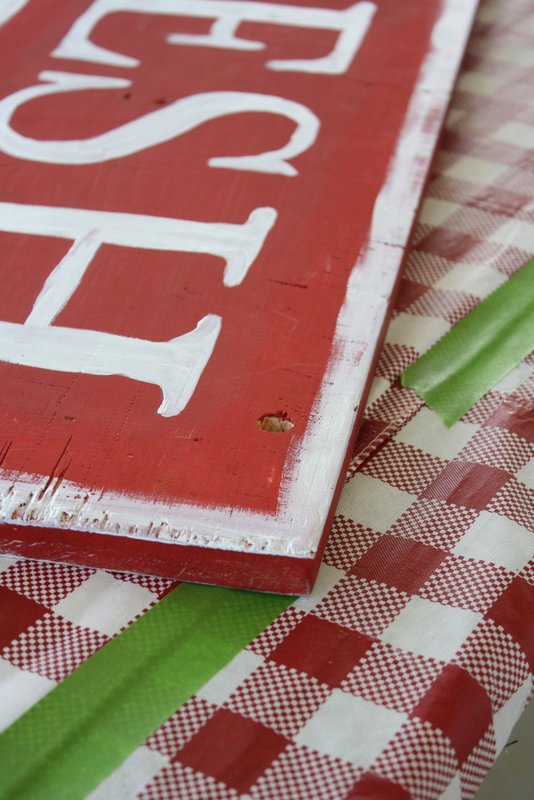
Step Three: Paint your board. I like to use Annie Sloan chalk paint; however, you can use ANY paint you want. The main reason I like the chalk paint is that it dries very, very quickly so once I’ve got my first coat of paint on I only have to wait 15 minutes or so to start on my lettering. But, you seriously can use any old left over paint you have. Just make sure it is the color you want! I love red. I honestly end up painting so many of my signs red because the color is just so perfect. You do not need to cover every single bit of the wood; it is okay if some of it shows through the paint a bit. The look we’re going for is rustic and worn looking.
.
.
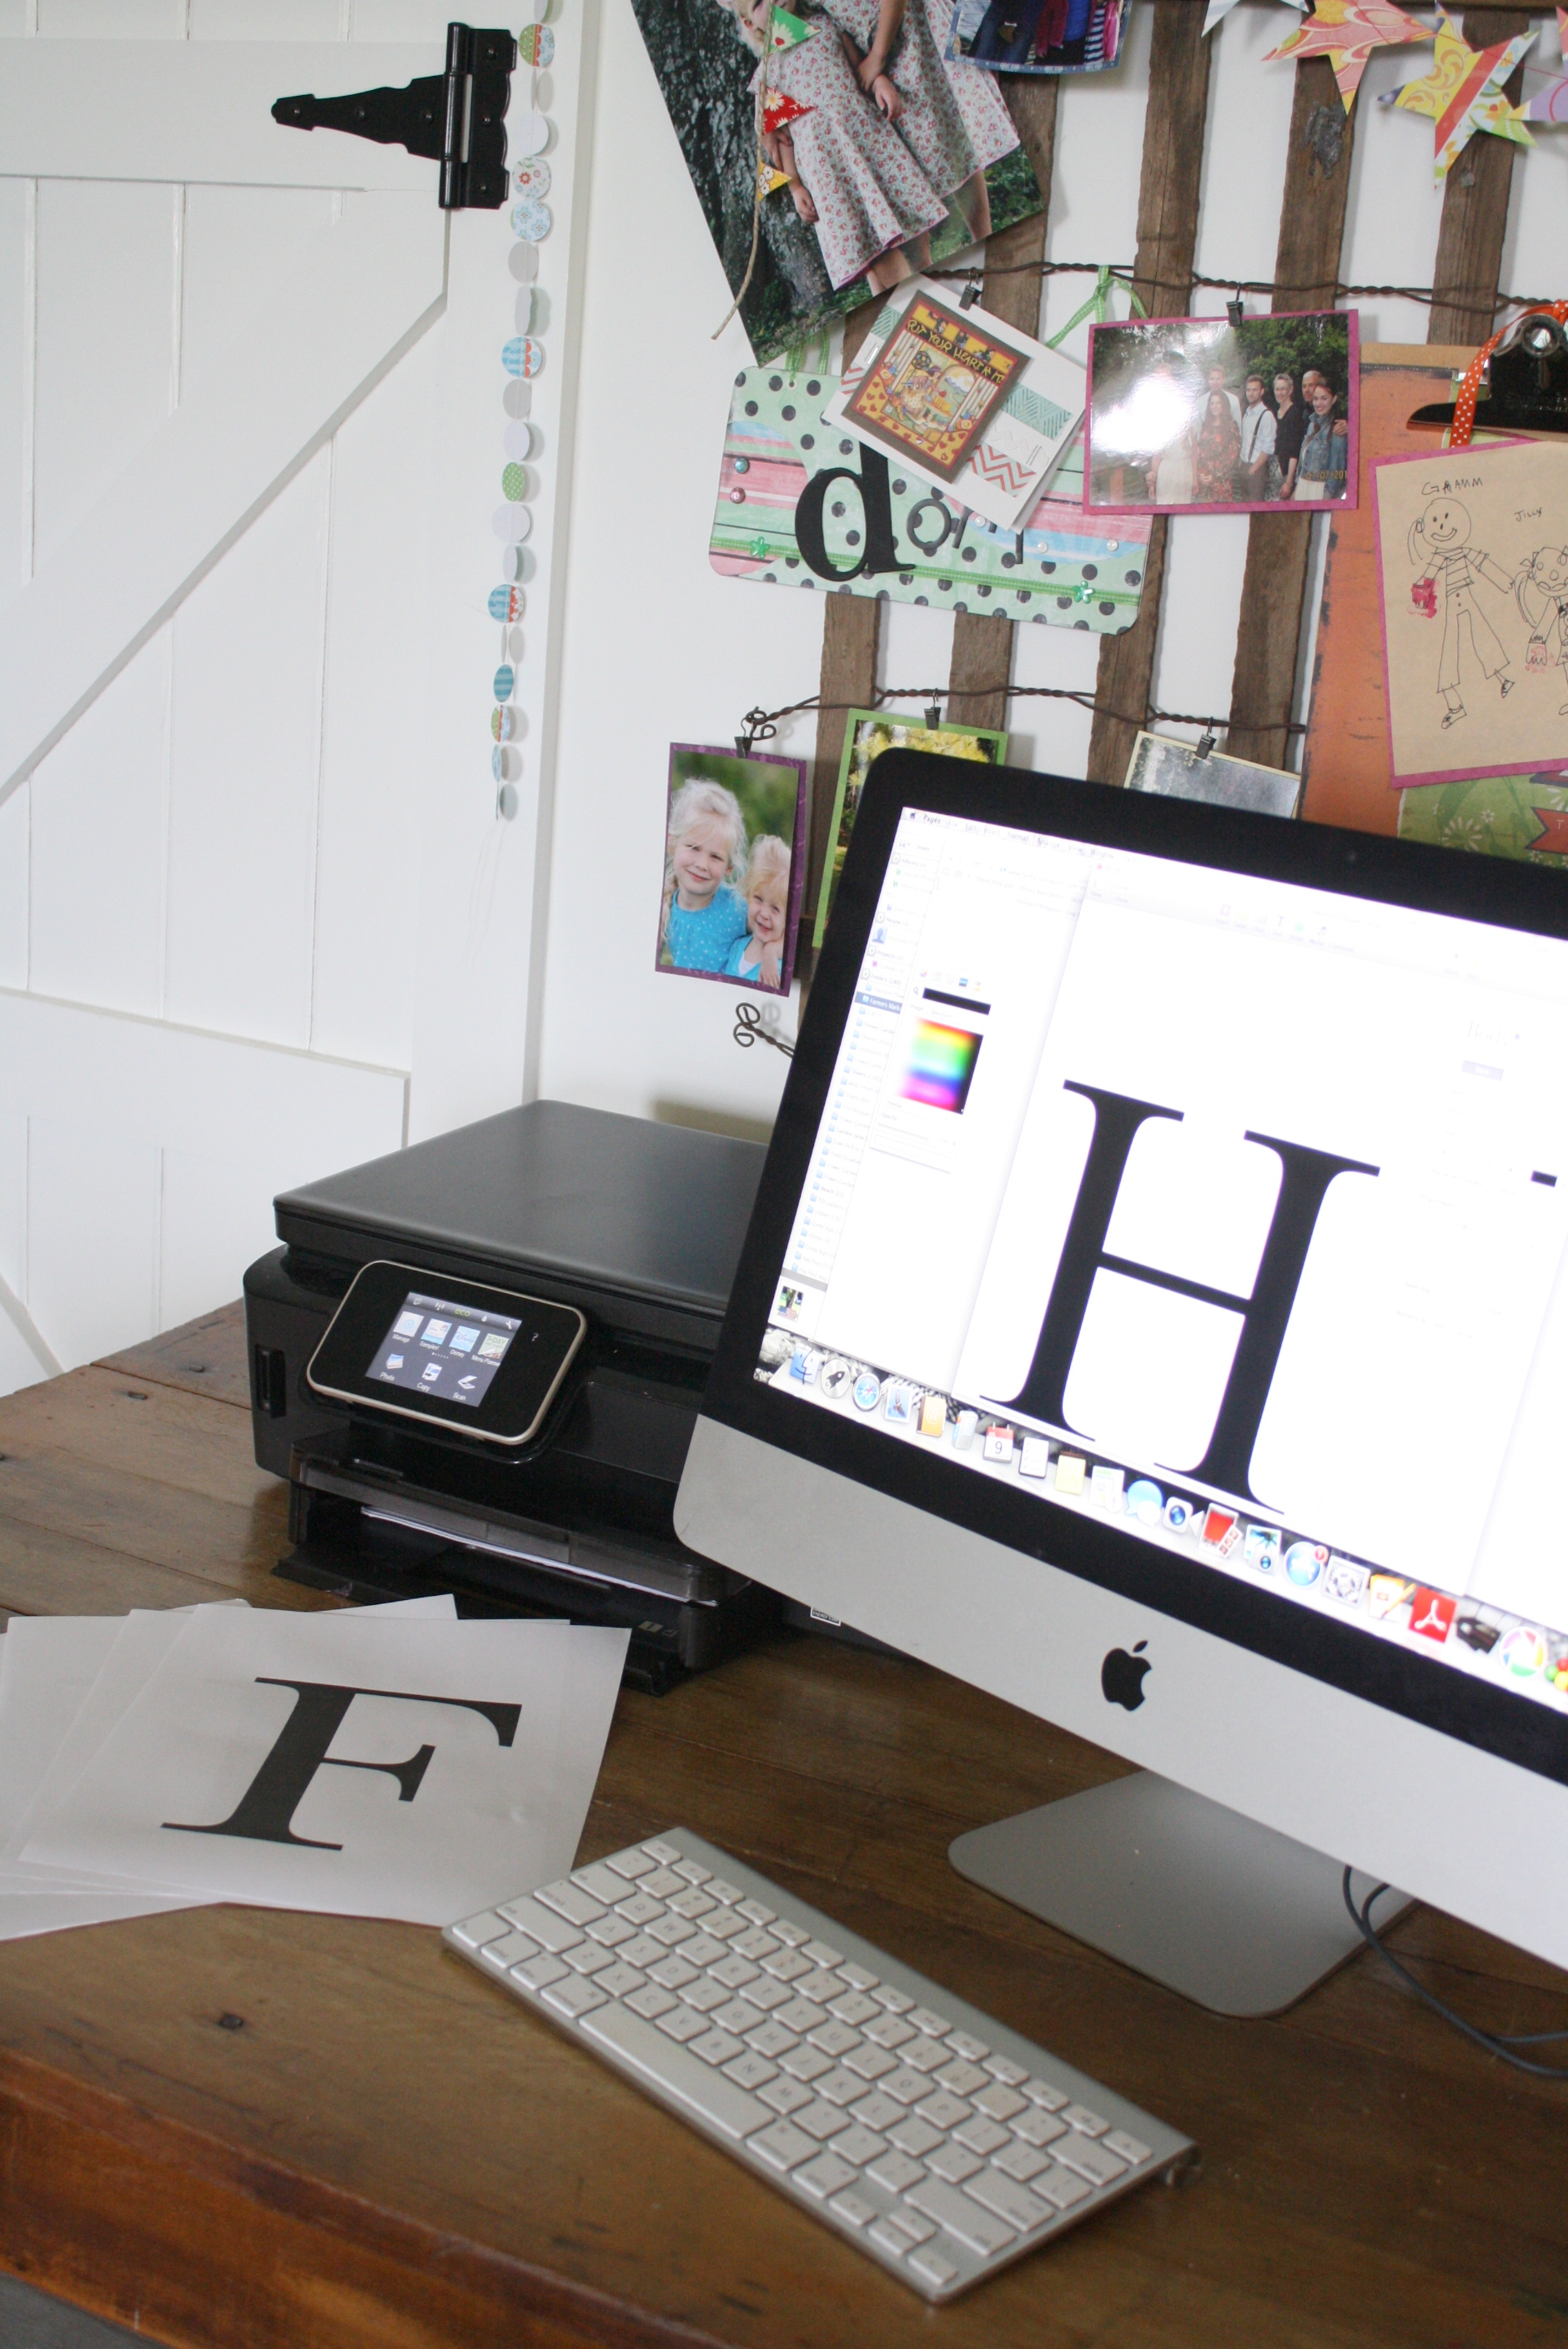
Step Four: Print your lettering. While your paint is drying, sit down at your computer in a word processing program and find a font that you want your letters to be. I like a block type of font as it is so much easier to paint. You will have to do some figuring on letter size to determine how large your letters should be in order to fit on the board properly. In my case I’m using the font Baskerville at 700 pt because I want it very large. Once you’ve got that figured out, print your letters. Mine printed at one letter per page. (You can also free hand draw your letters. I’ve done that, but wasn’t very happy with the results.)
.
.
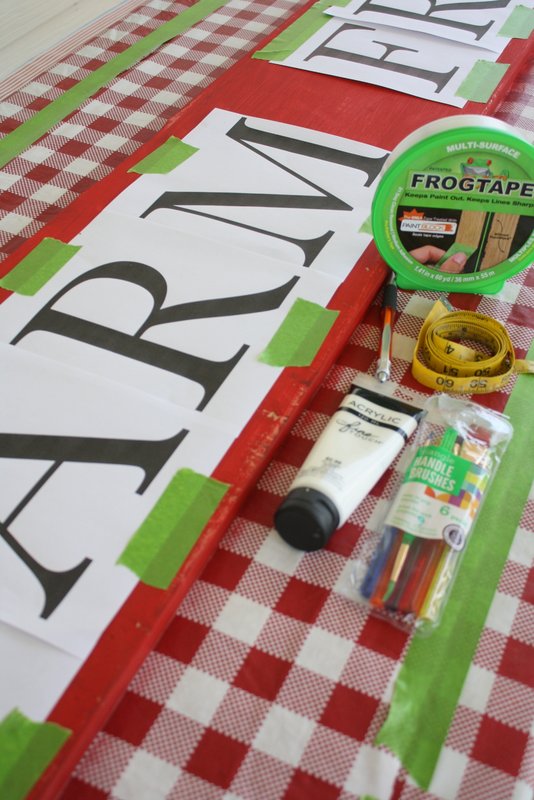
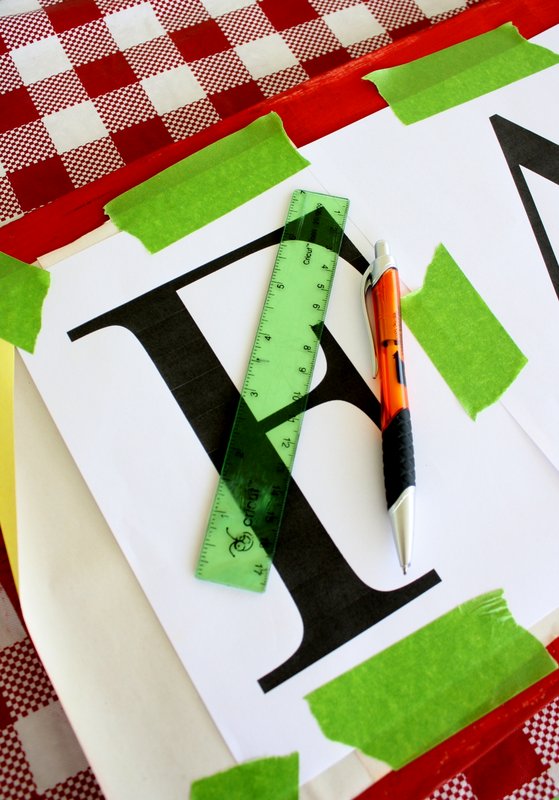
Step Five: Tape your letters in place. You will lay your letters onto your sign, adjusting as needed. You may want to trim your paper so there isn’t any overlap between letters. Use Frog painters tape to lightly tape your letters into place. I tape to the wood at the top and the bottom of each letter.
.
.
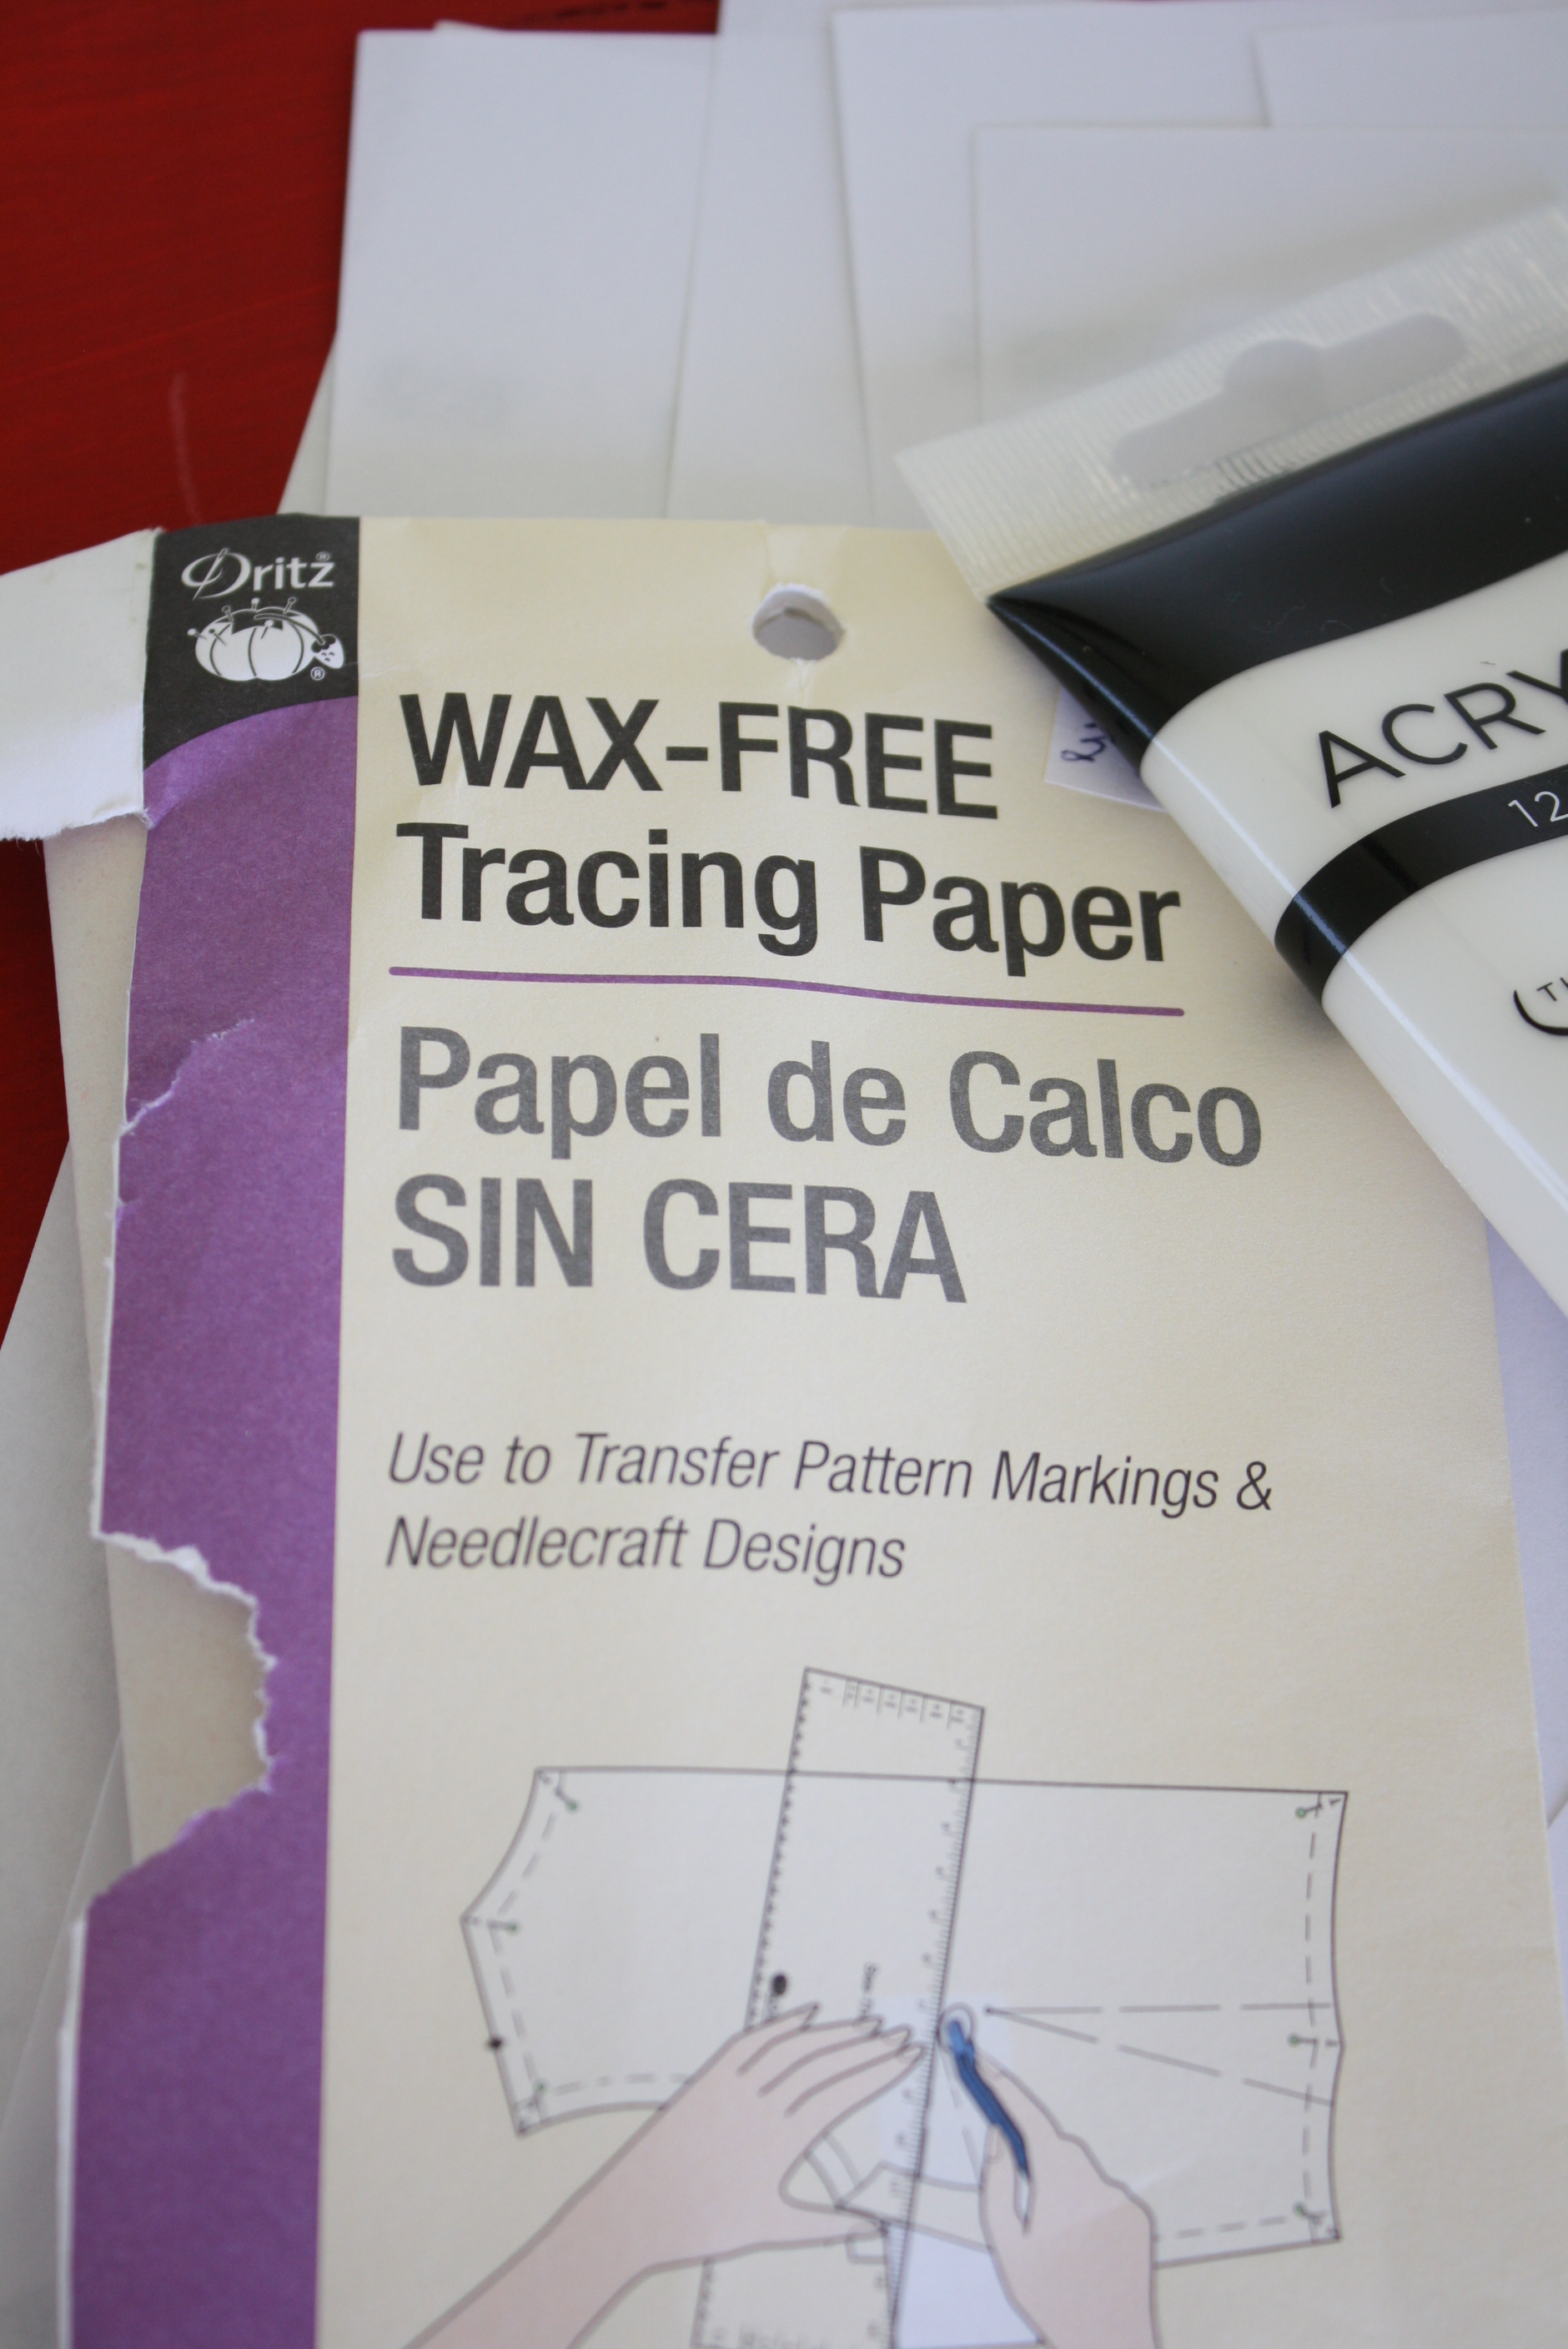
Now, there are many ways that you can transfer your letters to the board in order to paint them, and I’ve tried a lot of different methods but the one that works the very best for me is dressmakers tracing paper. (You can buy it at any fabric store.)
.
.
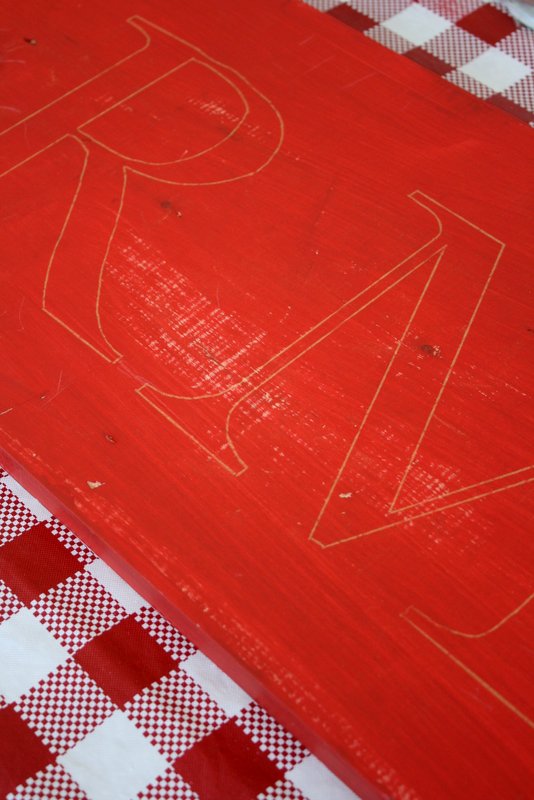
Step Six: Transfer your letters. Take a small piece of the tracing paper, a little smaller than the size of your printer paper, and lightly lift up one end of your first letter, place the tracing paper underneath and tape your letter in place again. Take a pen and trace your letter, being careful not to move the paper. Do this process one letter at a time until you’ve traced all the letters.
.
.
And you end up with perfectly transferred letters.
.
.
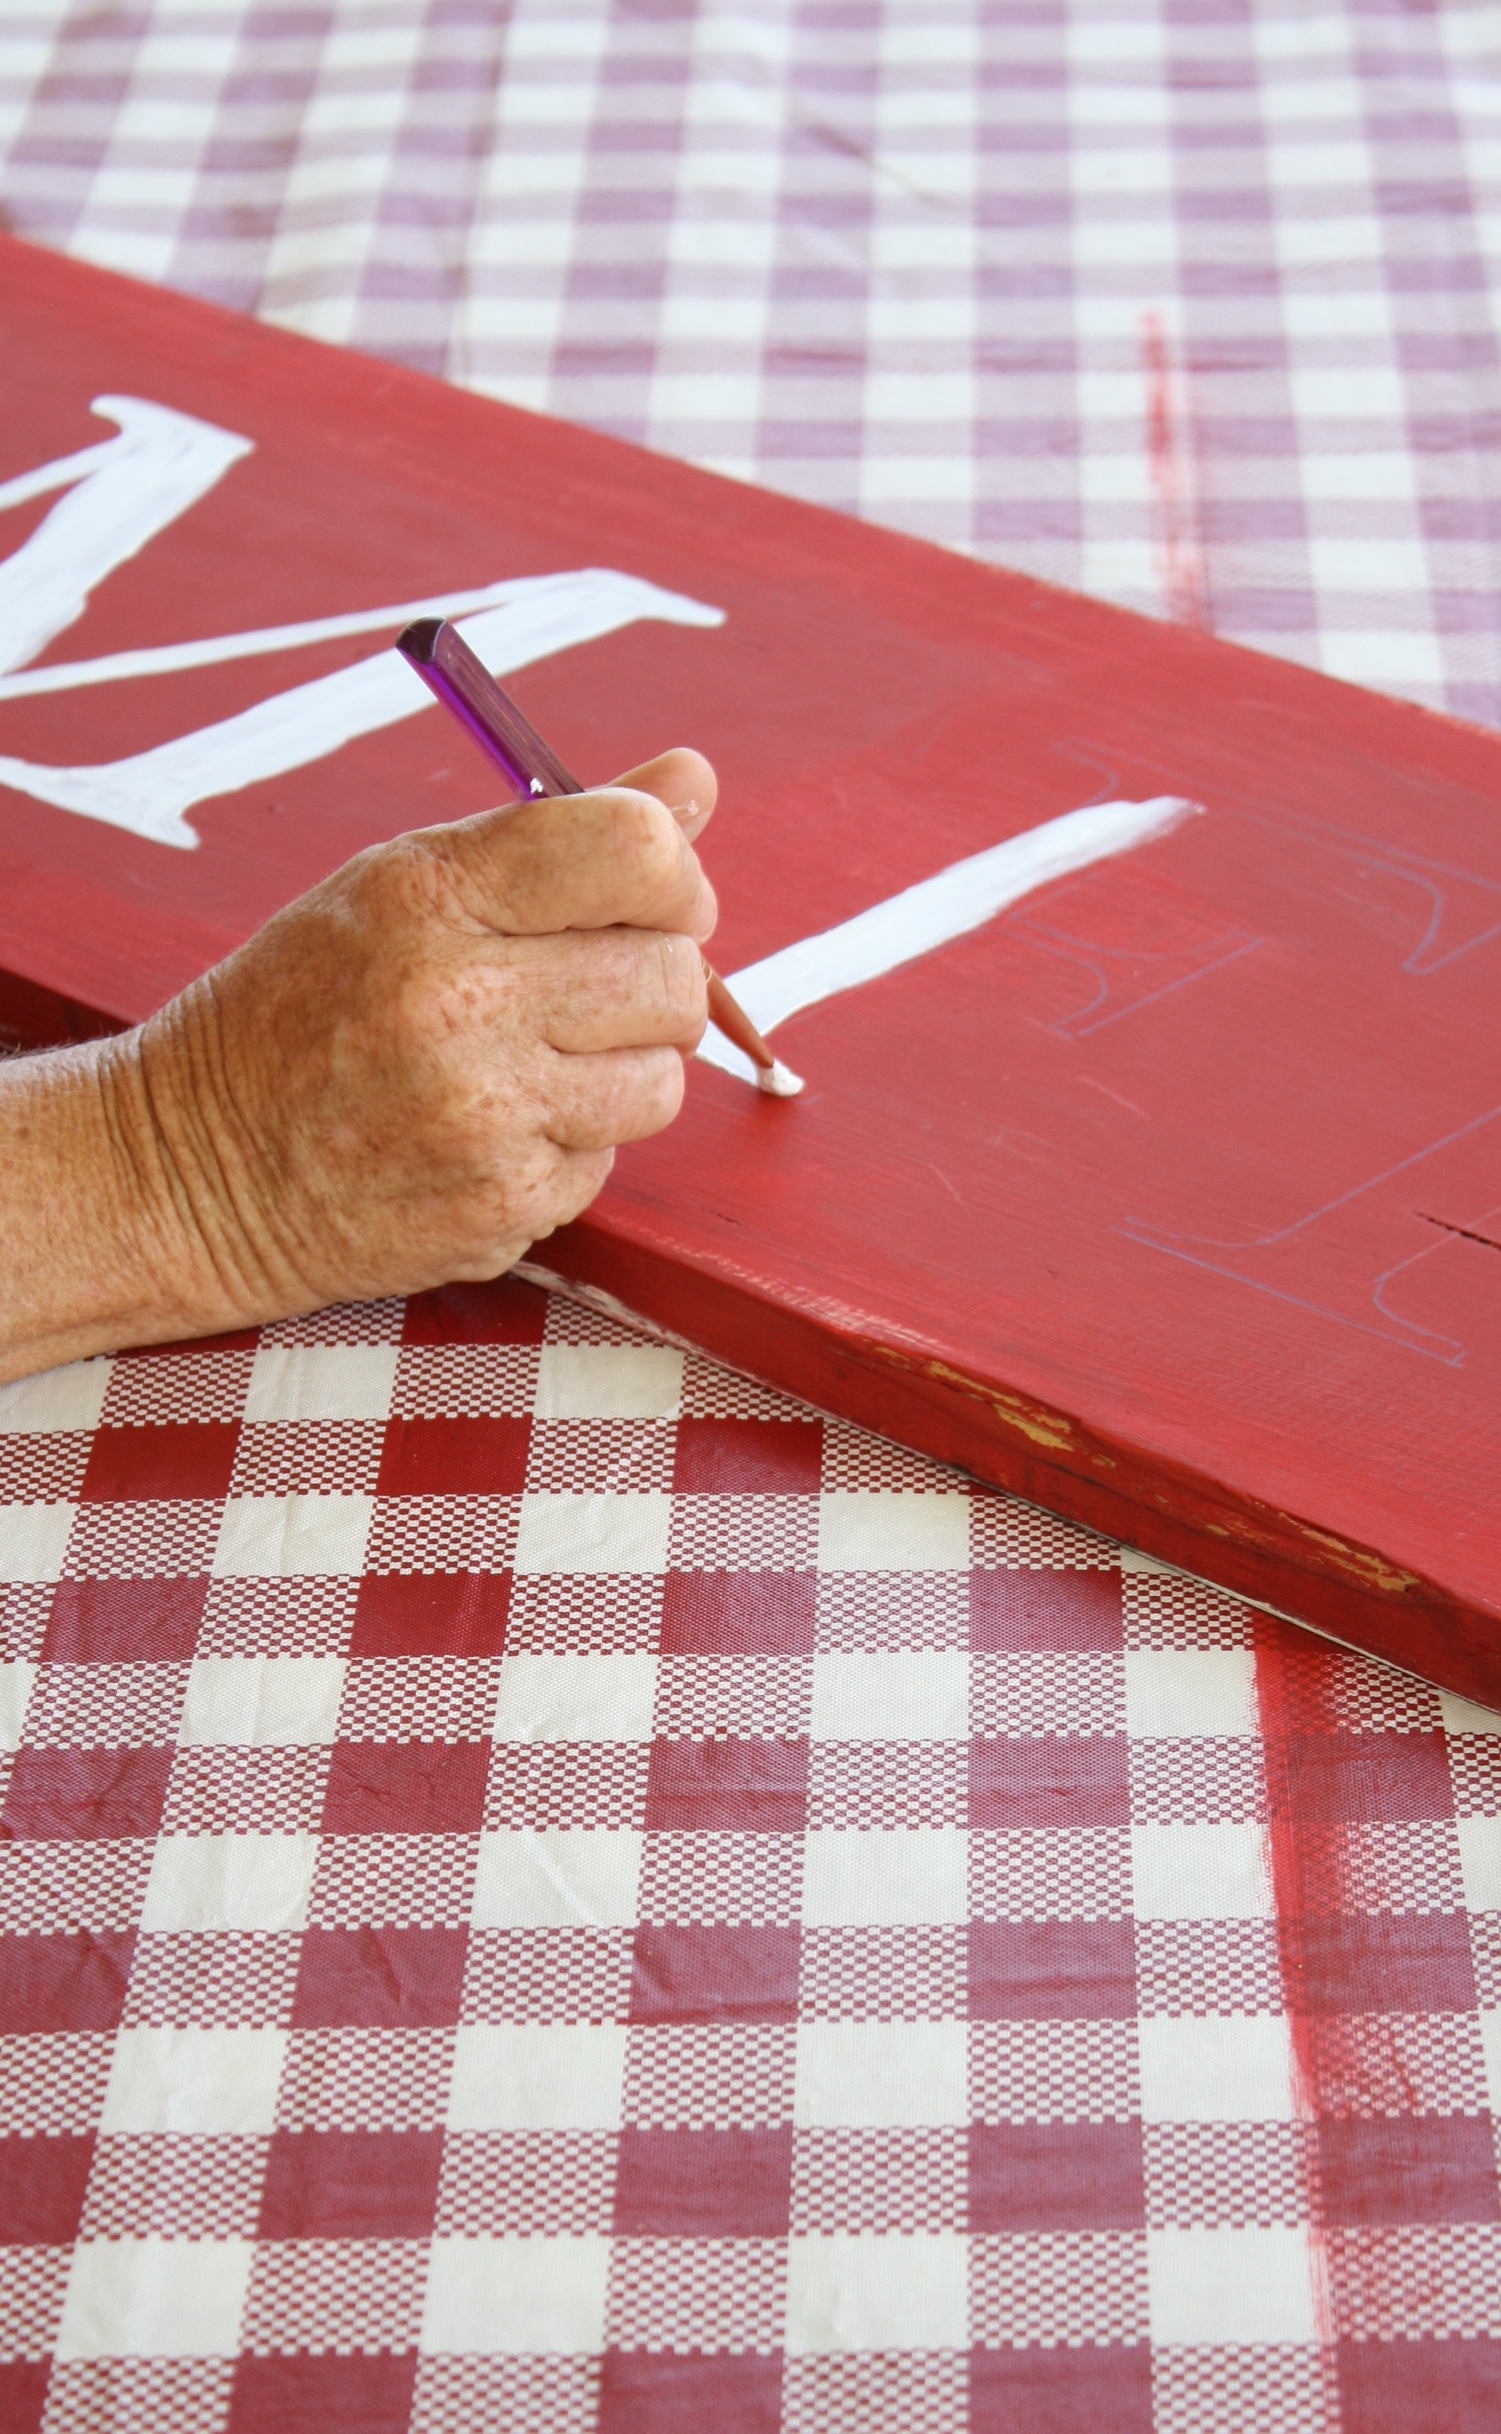
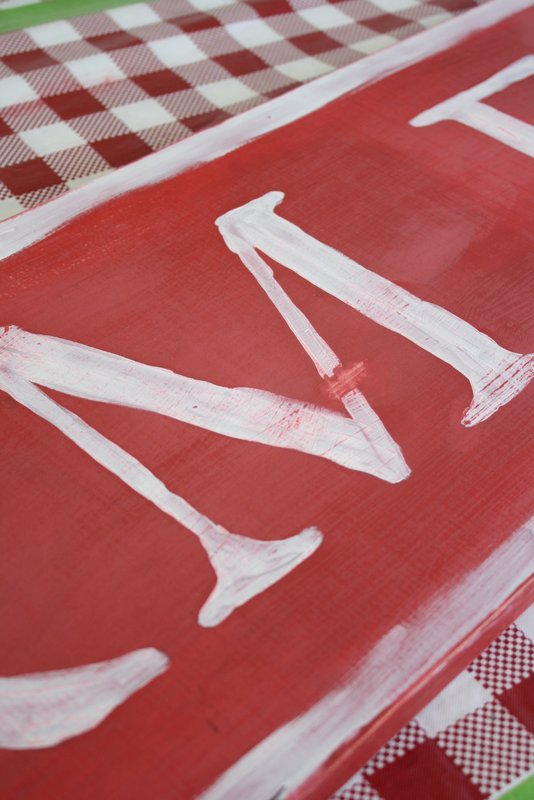
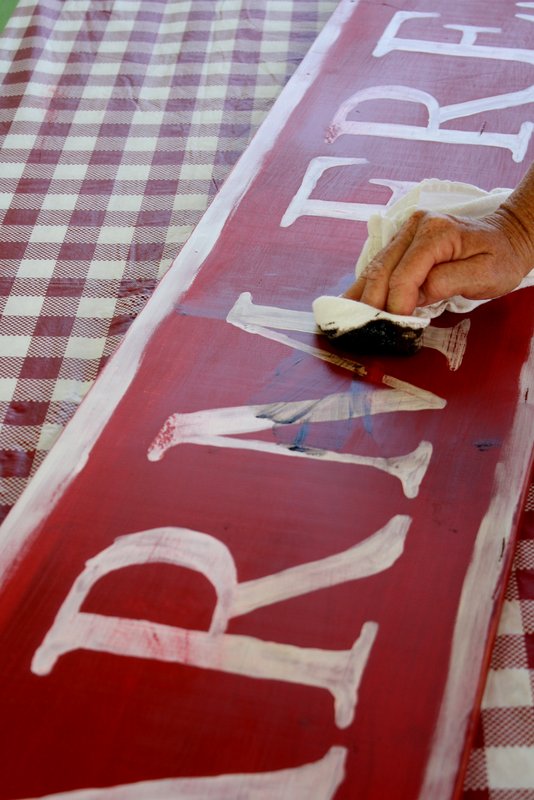
Step Seven: Paint your letters. I am not a perfectionist and I tend to do things very quickly and so I just take my little brush with some white paint and I fill in the letters. Sometimes it will take two coats to cover the undercoat of paint completely. Don’t get discouraged if your letters are smudged and smeared. It adds character. (And yes, I am a redhead that spends a lot of time in the sun so my hands are freckled and wrinkly. But I DO wear a lot of sunscreen!)
.
.
Step Eight: Paint your border. Then, using the same little brush and white paint I free hand a border around the edge of the board. You can vary the size, on this sign it is about 1/2 inch. I definitely do not make this border straight and perfect. It is very rough looking.
.
.
You can see in the above picture that I’m not at all particular with my painting!
.
.
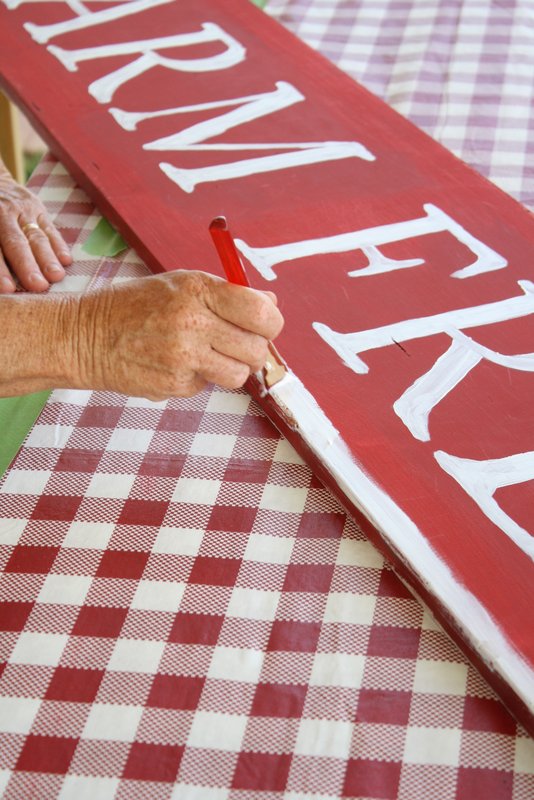
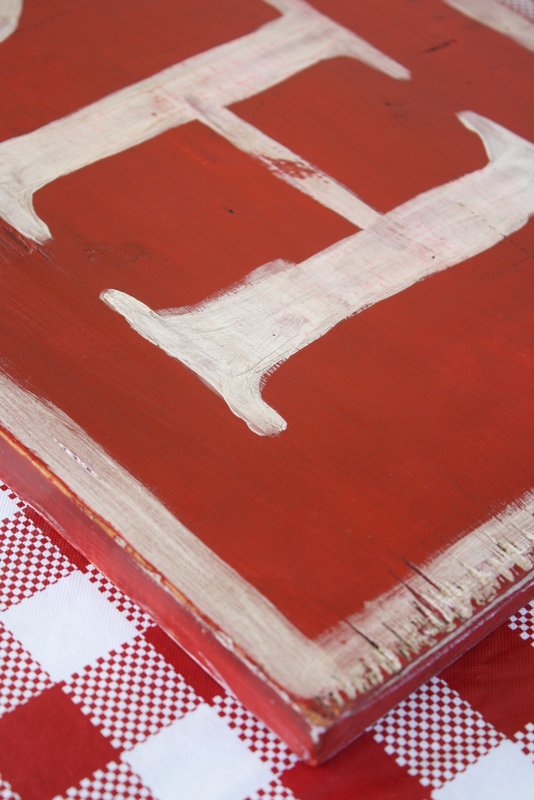
Step Nine: Sand your letters. Once my lettering paint is completely dry, I take my mouse sander again and I lightly sand the entire surface. In some areas, I actually sand off an edge of a letter, or part of the border to make it look old and worn. Using an old rag or t-shirt wipe off the sign and sand again until you are happy with how it looks.
.
.
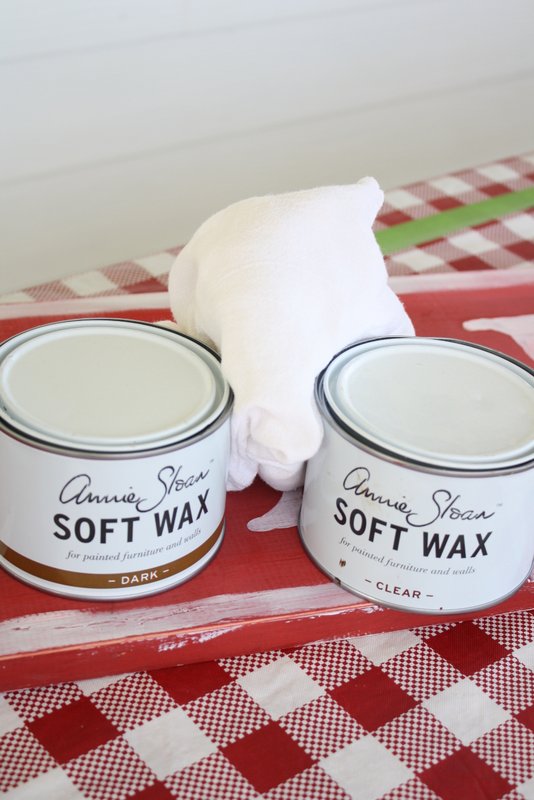
These final steps are the ones that really, really make your sign come alive. You need furniture wax! Once again, I use Annie Sloan but there are many wood waxes on the market that would be less expensive and would work just as well.
.
.
Step Ten: Apply light wax. Using the light wax first and an old t-shirt, apply a very light coat to the entire sign. Buff it until it is dry and smooth. You can’t really see in the above picture, but the purpose of the light wax is to create a barrier so that the dark wax adheres smoother and more uniform.
.
.
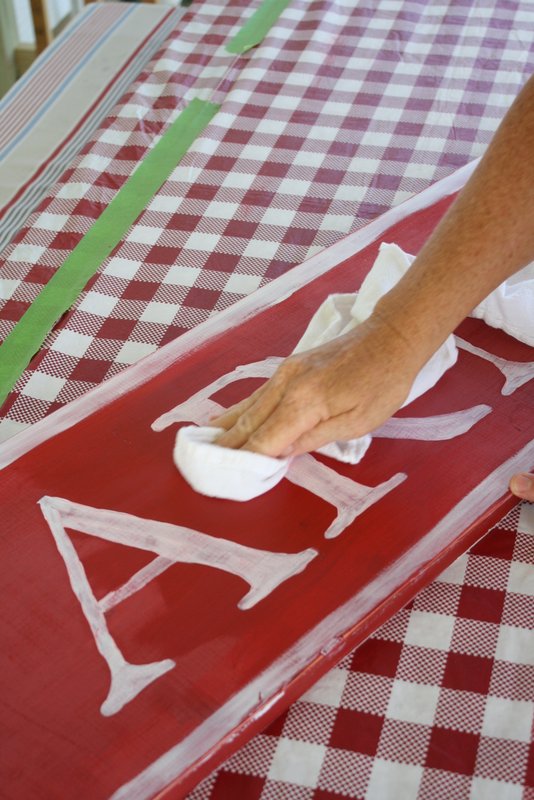
Step Eleven: Apply dark wax and buff thoroughly. Now, for the grand finale. You will want to switch to a dark wax and apply in the same way as the light wax. It takes very little dark wax to give it the vintage look we are going for. Just apply in small sections and with your soft rag or t-shirt rub it in. Once you have waxed the entire sign buff it with your rag until it is as smooth as butter. One of the big advantages to waxing is it waterproofs your sign if you are hanging it outdoors.
.
.
And also the dark wax really gives it the old vintage look.
.
.
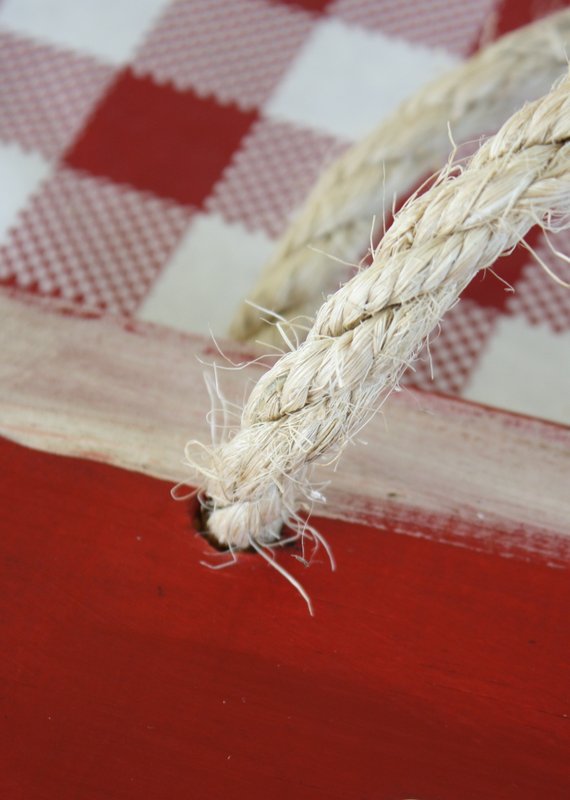
And that is it! You can attach a picture hanging hook to the back if you are hanging on a wall. I drilled holes in mine and threaded a rope through in order to hang from the top of our work shed.
.
.
I made the sign two sided so that we can read it from inside the work shed…
.
.
…and from the outside!
.
We’ve got a lot more prettying up to do in there and that just might be a future blog post!
.
When you make your own vintage look sign, be sure to email me a picture! I can’t wait to see it!
.
Until our gravel roads cross again… so long.
.
Dori


I LOVE this! Hopefully I will make the time to make one or two for myself!
Ann,
Please do make a sign or two! I know the tutorial looked hard but seriously they are so easy!
Send me a picture!
– Dori –
Dori!!! This is fabulous!!! Thank you, kindly!! I’m gonna make me a sign! I’m with you…red speaks to me. Your open air shed is adorable. I hope you do post again on how you spruce it up. Thanks again.
Jodie,
I can’t wait for you to make your own! And send me a picture please!
– Dori –
enjoyed the tutorial on sign painting! I may have to give this a try now.
Denise,
Please do!!! And don’t forget to send me a picture!
– Dori –
Love your signs!!! great tips too and such a beautiful setting to display them. And, to me, your hands are superb, showing love and caring – like most all farmgirls we all have a few wrinkles. God bless.
Dear Joan,
Thank you. I looked at those pictures and thought, “when did my hands start looking like my mother’s”? And then I realized I AM my mother! Both redheads, both Ranchgirls, both hard working outdoor women. And plus I love my mother’s hands! 🙂
Thanks for writing!
– Dori –
Good morning!
Thanks for the sign tutorial…I have always wanted to try a quilt for the side of our garage…I may just attempt it now. 🙂 I have heard and seen so much about Annie Sloan paint and wax. I really should try it. Honestly, I don’t really enjoy painting…but I don’t enjoy the prices on already made things either…so I need to just DO IT!!! 🙂
(I just read about the virtuous woman again this morning…it speaks a lot about her hands. The thought I got from reading it again was this; to be busy in a good way, is gain.)
Have a great weekend!
Colleen
Hello Colleen,
I researched SO many different quilt patterns and found one I loved and was all set to make it for the side of our house. And somehow I just never could manage to get it to come out the way I wanted. Here in Tennessee there are wooden quilts on barns all over the place and you can actually register yours in a map with the name of the pattern etc. They even have guidelines on the correct wood to use, size, etc. Anyway, someday maybe I’ll give it a try again. If you make one, send me pictures please!
– Dori –
Hi love your signs. I also like signs and am always look for new sayings to put on my signs. Thanks for all the helpful hints! Thanks for sharing. Ellen
Ellen,
Do you make signs? I’d love to hear if you have any better ways of doing things. I’m definitely learning.
Thanks for writing. (And email me some pictures of yours.)
– Dori –
Hi Dori,
I can not believe just how much alike we are. You know in the past I have told you now much I like your kitchen. For years I have been collecting red and white things to put in my white kitchen. Right down to having an old fashioned red and white step-stool just like yours. I have also been planning on putting the darker brown floor in there.
The house I moved into when I married had a lot of yellow-gold colored wood paneling in it. Every room. The kitchen has darker wood in it. I am so glad I will be moveing to my own place where I will do the walls white in the kitchen and red accents.
I am a redhead also. It use to be bright cooper color now it is getting the color of yours. My hands use to be like yours now they are crepe, wrinkle, and covered with freckles. They also have a few age spots. Testament to being an outside women.
Lots of hugs to you,
Love the flowers,
Kay
Hi Kay,
I didn’t know you were a red-head too! That is so awesome!
Our hands certainly do tell how we spend our days don’t they? Mine have NOT been pampered. 🙁
I bet you are getting excited to be back in a house and get things just how you like them. How are things going for you these days?
I love my little red step stool. It is the place where anyone that visits my kitchen sits! Regardless of age, they sit there and visit while I cook. I love it.
Hugs,
– Dori –
What a great tutorial and a terrific idea.
We have a Farm Girl group here and I’m going to propose this as a project.
I don’t live on a farm (more’s the pity!!) but both sets of grandparents did and I had a taste of that wonderful life as I was growing up. I sure never got home sick for the city when I was on the farm!!
Hmmmmm, I think I could make little signs for our little city yard and dress the place up. : )
These signs sure do bring back memories of my times on the farm.
Thanks so much for sharing.
Pat,
This would be a great project to do with others!
Oh you could make some fun signs for your city yard! Send pictures! 🙂
– Dori –
Nice signs. Great job and lesson
Susana,
Thank you! Hope you’re doing well.
– Dori –
I’m managing one day at a time, and feel the loneliness , especially around meal times and the things we used to do together. I pray a lot too, because I have to do a lot of things alone, thise things my better half did. Even the dog feels depressed. But I find I love the quietness, but not all the time because even that becomes fearful. But listening to music brings me down. Even the good songs. Its quite eery. But staying busy and eating out help a lot. But sleep is elusive. Prayer seems to be the only thing consistent in my life lately.
That’s a wonderful tutorial! I’m always seeing signs and rustic pictures that I would love to have, but they are expensive. Even when they are affordable, well, I want more than one you know! Oh, but I can do that, I tell myself – it’s simple. Ha. Not a clue where to start. Now you’ve done it… created a sign fanatic. I love it!
Cindi,
I hope you’ll try making some signs and I really hope you’ll email me some pictures! 🙂
Happy sign making!
– Dori –
Thank you so much. You did a great job! I cant wait to try it. this may be the project to get our Vermont Farm girls together.
Noreen
Noreen,
It would be a great Farmgirl project! Please be sure to share pictures if you do!
– Dori –
Love. Love. LOVE your signs… I’m crazy for red too..I’m making a sign for my booth at the farmers market and your tutorial is just what I needed!
Thanks for sharing it! Big hugs! Deb ( Beach Farmgirl)
Hi Deb,
Red just screams country farmgirl don’t you think?! 🙂
Did you make your farmers market sign? I’m so excited to see pictures of your booth set up. I know it will be amazing!
– Dori –
Dori, thanks so much for the tutorial on sign making. I cant wait to get started on one. Your signs all look Great! Be Blessed Neta
Vivian,
I hope you’ll try one! And let me know!
– Dori –
I love your post. I too make my own signs. I did an Eggs one to make my hen house a bit more like Debs. I did a New England sign, Potting Shed and a few more. I use very similar process as yours. I use the dritz carbon paper too. I loved seeing your sign. The Farm Fresh is one I love as I do your cart. Happy gardening!
Hi Donna,
I spent a little time perusing your blog after Deb wrote about you! I did notice your Eggs sign and I wondered if you had made it.
I enjoyed your blog!
– Dori –
OH MY GOODNESS DORI! I think we are twins separated at birth! Another something we have in common. Gosh if we were neighbors we’d get in so much fun trouble together! I ADORE signs. I love them all – old, new, wood, metal. My dad made me a couple back years ago when he could still do things like that, out of wood. He made the sign to the ranch that hangs over the gate in Texas. My friends know how much I love signs, too. Just this afternoon, a dear friend gave me a new one for my kitchen for watching her chickens while she was on vacation. It’s metal with a little chick on it in red and yellow. BUT I HAVE NEVER MADE ONE! You are an inspiration! Awesome post. And I love your farm. It’s beautiful. Farmgirl Hugs, Nicole (Suburban Farmgirl)
Hi Nicole!!!!
We do tend to think alike, I totally agree with that! 🙂
When I read your post last time on you Dad making the Coca Cola signs I meant to ask you if you have one? They would be worth a mint now for sure. And a really special memoir to own one!
There have been times in my life when I’ve had so many signs around my husband has said, NO MORE!!! So I’ve tried to only keep the ones that really are special to me. I’m going to get started on attempting the barn wooden quilt sign again. I just wasn’t happy with the direction it was going before. I think I’m more confident now. The trouble is that they are huge. Like 8 feet x 8 feet. It’s a lot of work.
Please make a sign!!!! 🙂
– Dori –
Wow, Dori, thanks for this great tutorial for sign making! Like you, I love all of those old vintage signs but they do cost so much money. Now with your great How-To guide, I could try my hand at making a few myself. I love your Farm Fresh roadside stand and now new work station. They both look so perfect on your beautiful farm!
Hi Winnie!
Those vintage signs just speak to us don’t they? 🙂
Please try making one! And let me know!
– Dori –
Love this! Can’t wait to try it out! 🙂
Hi Corri,
Please let me know if you try it – and send a picture! 🙂
– Dori –
Oh yes! I’ve been making signs for awhile now. If you get in a pinch and your printer is out of ink (or a cheapo like me!) you can very gently trace your letters on paper from your computer screen, I stress very gently! I also have decoupaged great scrapbooking paper on wood then transferred my letters as you’ve shown. HOWEVER I use regular carbon paper and would have a hard time seeing dark on dark BUT NOW you have me needing to go get dressmakers copy paper because of the lighter transfer lines!!!! Thank you, thank you!!!!!
Hi Trish,
I also used regular carbon paper and had a terrible time seeing it. Then I heard you could rub chalk on the back of the letters, then trace that. I tried that also but my lines were not very clear. The dressmakers paper seems to work the best for me. Plus you can use it over and over again!
I would love to see some of your signs! Email me some pictures of your favorites!
– Dori –
I like signs too. I get reclaimed wood from neighbors and recycle. So much fun!
Nancy,
Reclaimed wood is the very best. I made a Farmers Market sign recently on reclaimed wood, using a template that I bought from Funky Junk Interiors. The template was expense but WOW did it make a fun sign. And looked really awesome on reclaimed wood. I’d love to see pictures of the signs you make.
– Dori –
I have always wanted to try making some signs.
I love it!!
Thank you for sharing the tutorial 🙂
Hi Sandra,
I hope you will try one! And please let me know how it goes!
– Dori –